Joana Doce
Easy, Delicious, Gluten - Free Recipes Anyone Can Make
Recipe Posts
Gluten-free Portuguese Rice Pudding (Arroz Doce)
Ingredients:
1 cup short-grain rice (e.g., Carnaroli or Arborio)
Water (enough to just cover the rice)
4 cups whole milk
1 ½ cups sugar
¼ tablespoon salt
1 tablespoon ground cinnamon
3–4 strands of lemon peel
Preparation:
Cook the Rice:
In a large pot, combine the rice, water, and salt. Place over low heat and stir occasionally, allowing the rice to slowly absorb the water. Do not let the water evaporate completely—just until the rice is tender and still slightly moist.Add Milk:
Pour in 2 cups of milk, reserving the other 2 cups for later. Stir well.Add Sugar and Lemon Peel:
Stir in the sugar and add the lemon peel. Cook over low heat, stirring frequently to prevent the rice from sticking or burning.Incorporate Remaining Milk:
As the milk thickens, gradually add the reserved milk. Continue stirring often, allowing the rice to cook until it becomes fully tender and the mixture reaches a creamy consistency.Remove and Rest:
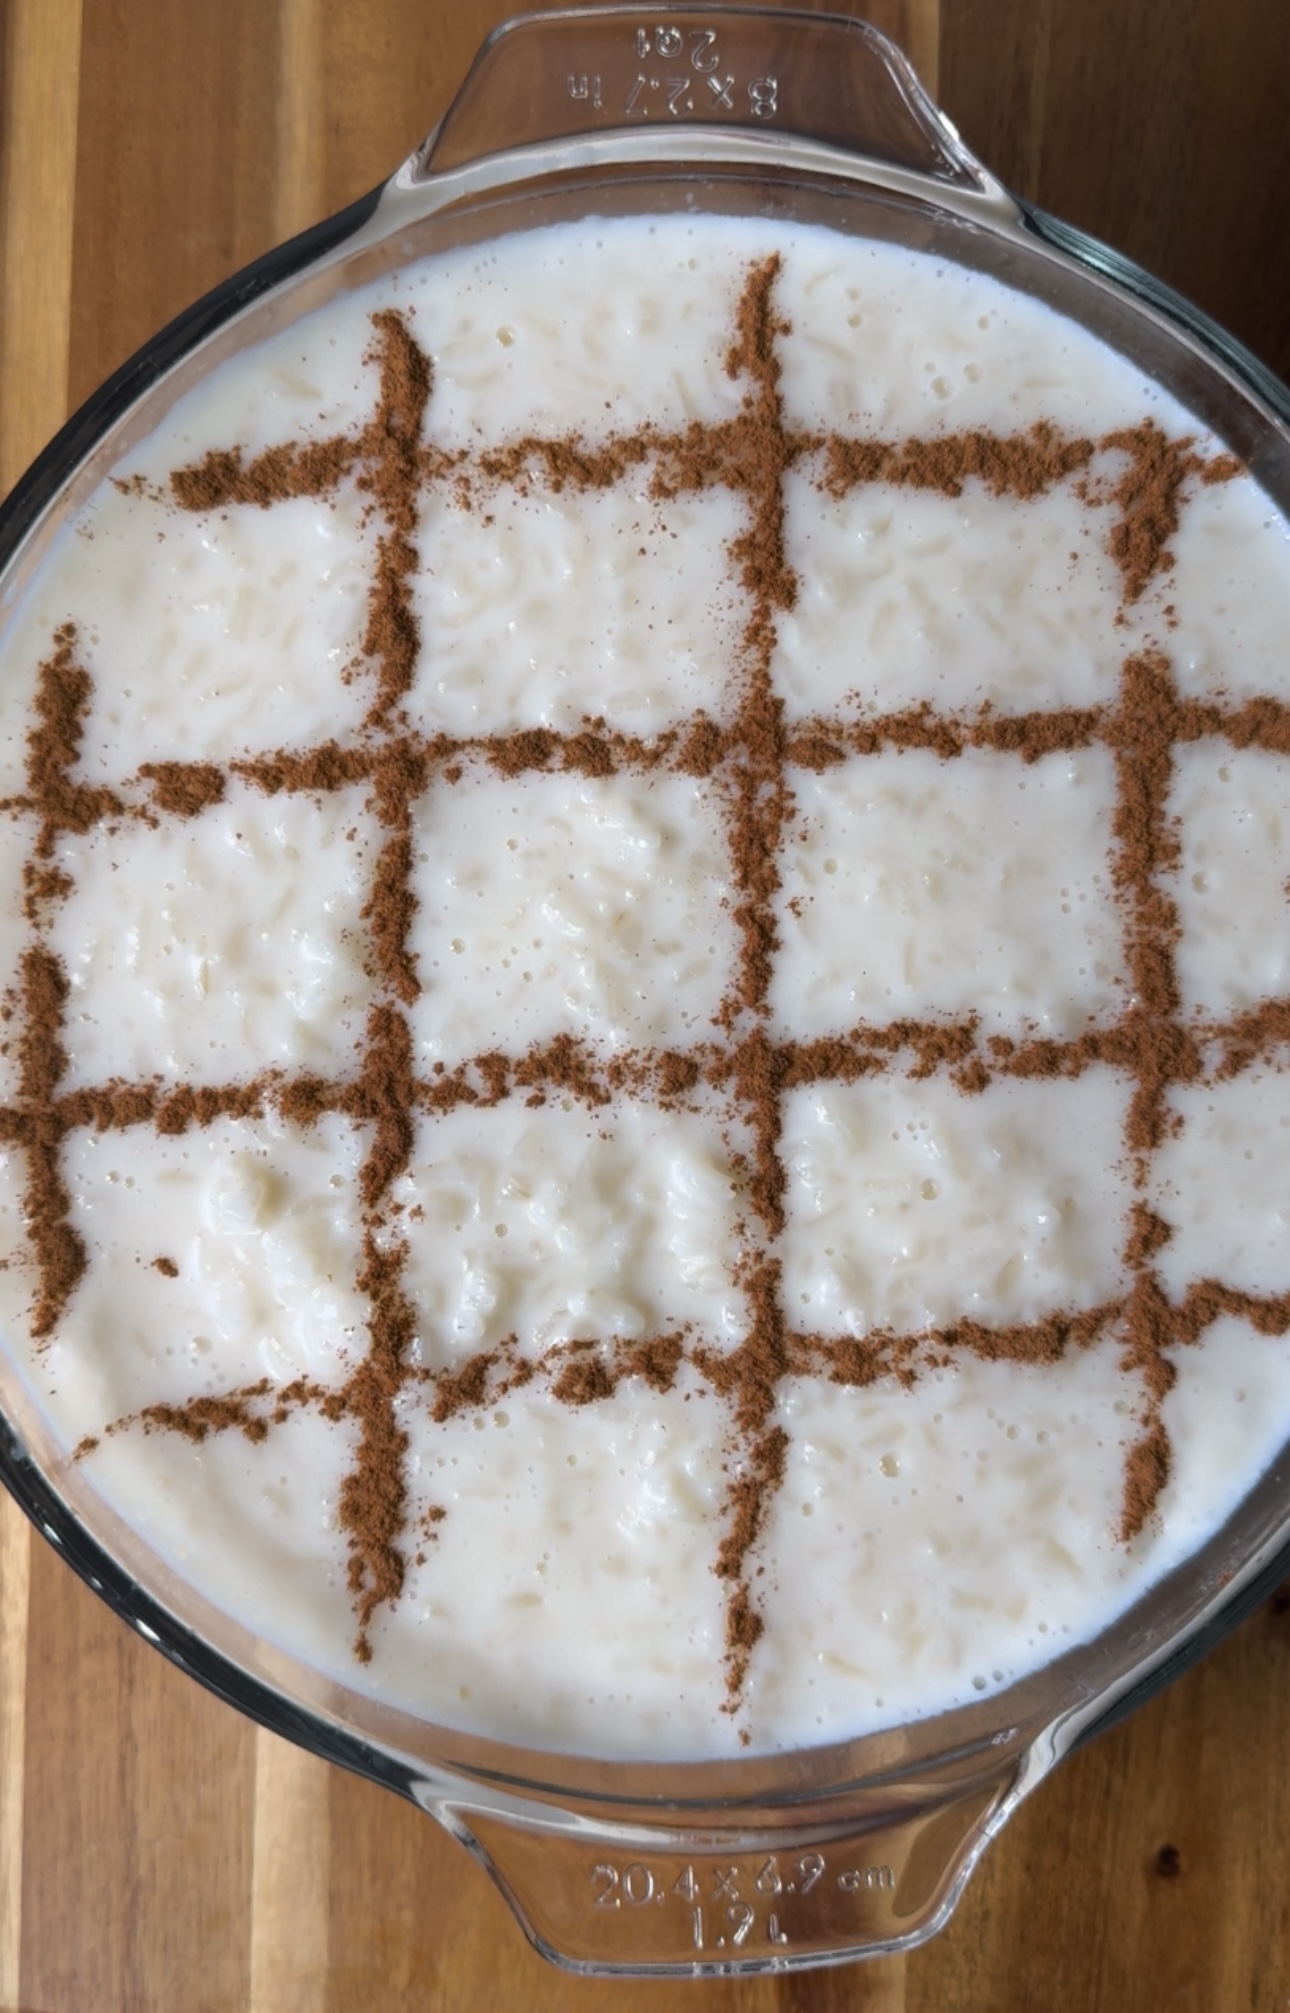
Once cooked, remove the lemon peel and transfer the pudding to a glass or serving dish. Let it rest for 5–10 minutes to cool slightly.Decorate with Cinnamon:
Sprinkle ground cinnamon on top to decorate, using your creativity to create patterns or designs.
Serving Suggestions:
Serve warm or chilled as a comforting dessert or a sweet treat for any occasion.
Enjoy the rich and creamy flavours of this classic Portuguese dessert! 😊
Gluten-Free Chocolate Cake
Ingredients:
2 cups gluten-free all-purpose flour (I recommend Bob’s Red Mill 1-to-1)
3 large eggs
1 cup oil (vegetable, coconut, or light olive oil works great)
2 cups sugar
1 cup unsweetened cocoa powder
1 cup hot water
1 teaspoon salt
1 tablespoon baking powder
Preparation:
Preheat the Oven:
Preheat your oven to 350°F (175°C). Grease a baking pan or line it with parchment paper for easy removal.Mix the Batter:
In a mixing bowl or blender, combine the gluten-free flour, cocoa powder, sugar, eggs, oil, salt, and hot water. Mix until the batter is smooth and lump-free.
Add the baking powder as the final step, folding it gently into the batter to ensure the cake rises evenly.
Prepare the Pan:
Grease the baking pan thoroughly with butter or oil, and dust lightly with gluten-free flour or cocoa powder to prevent sticking.Bake the Cake:
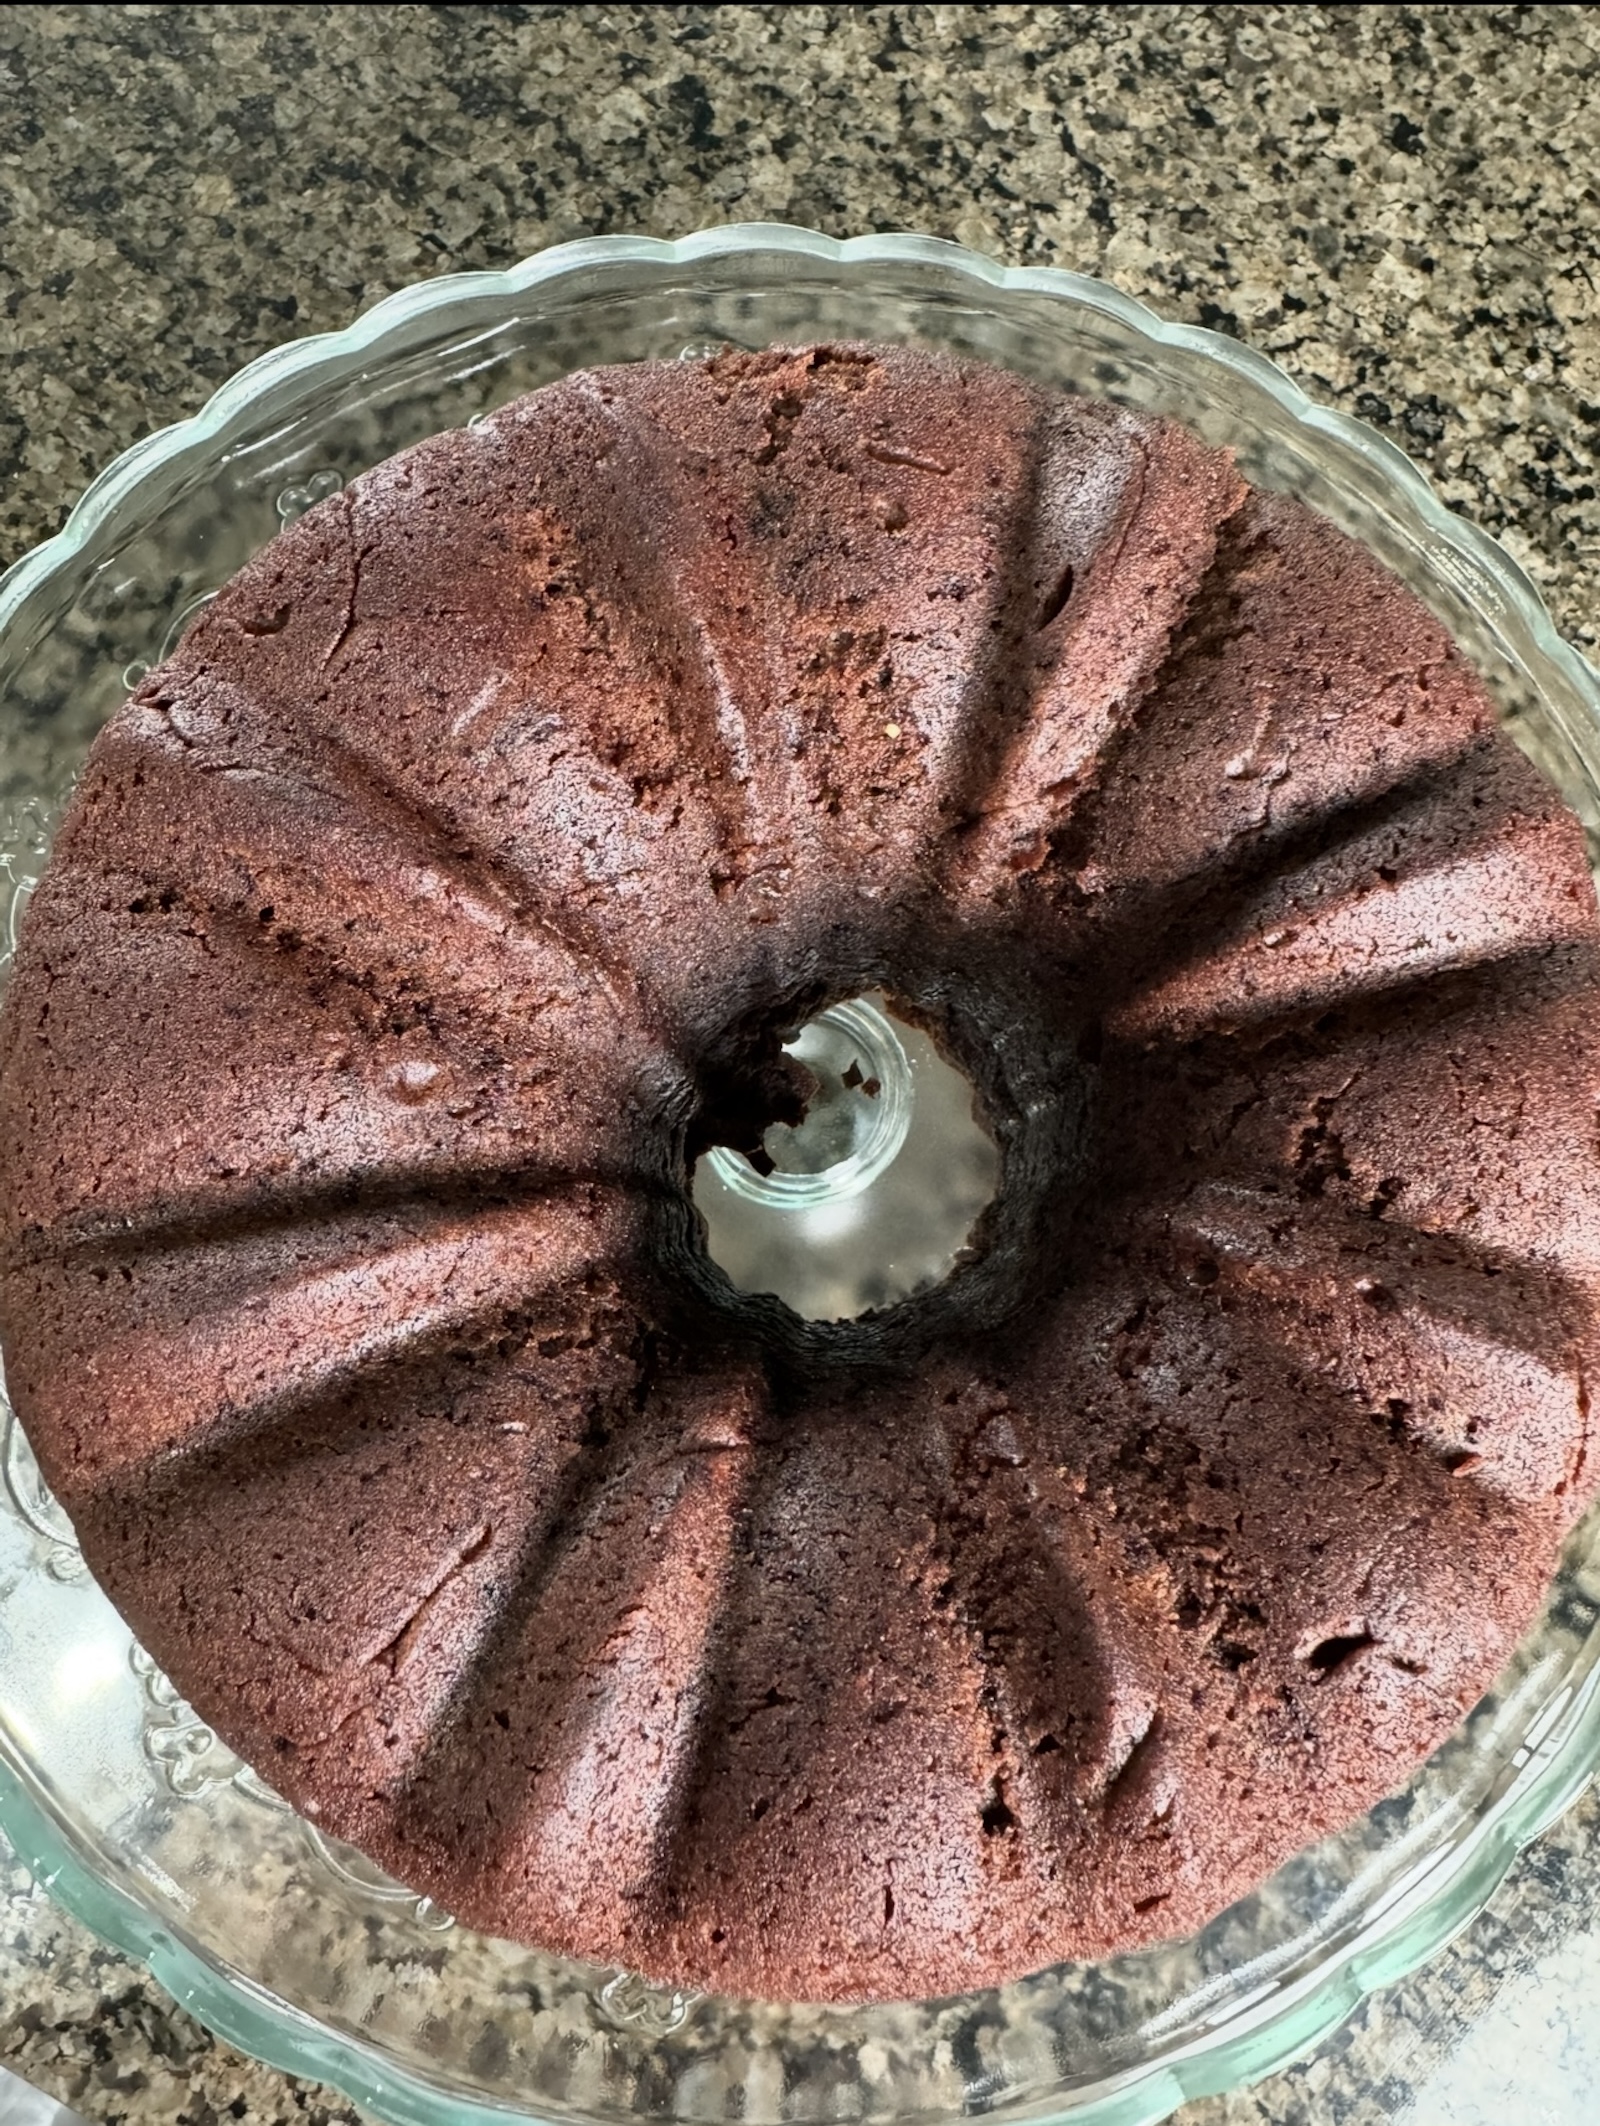
Pour the batter into the prepared pan and bake for 35–40 minutes, or until a toothpick inserted in the center comes out clean.Cool Before Serving:
Allow the cake to cool in the pan for 10 minutes, then transfer to a wire rack to cool completely before serving or decorating.
Tips for Success:
Enhance the Flavor: Add 1 teaspoon of vanilla extract or a pinch of espresso powder to the batter for extra depth.
Toppings: Dust with powdered sugar, drizzle with chocolate ganache, or frost with cream cheese or buttercream frosting.
Moisture Boost: Swap half the oil for unsweetened applesauce for a slightly lighter and extra moist texture.
This gluten-free chocolate cake is rich, soft, and perfect for celebrations or just because! Let me know how it turns out.
Gluten-Free Waffles with Toppings
Ingredients:
1 cup gluten-free waffle mix
1 egg
1 cup milk
2 tbsp melted butter
2 strawberries, sliced
¼ cup sliced almonds
Chocolate (suitable for melting)
Ice cream (your favorite flavor)
Nutella
Equipment:
Waffle maker
Preparation:
Preheat the Waffle Maker:
Follow your waffle maker's instructions to preheat it to the proper temperature.Prepare the Batter:
In a mixing bowl, whisk the egg and milk together until well combined.
Add the gluten-free waffle mix and stir until the batter is smooth and free of lumps.
Mix in the melted butter and stir until fully incorporated.
Cook the Waffles:
Pour the batter into the preheated waffle maker, ensuring it's evenly distributed.
Close the waffle maker and cook according to the manufacturer's instructions until the waffle is golden and crisp.
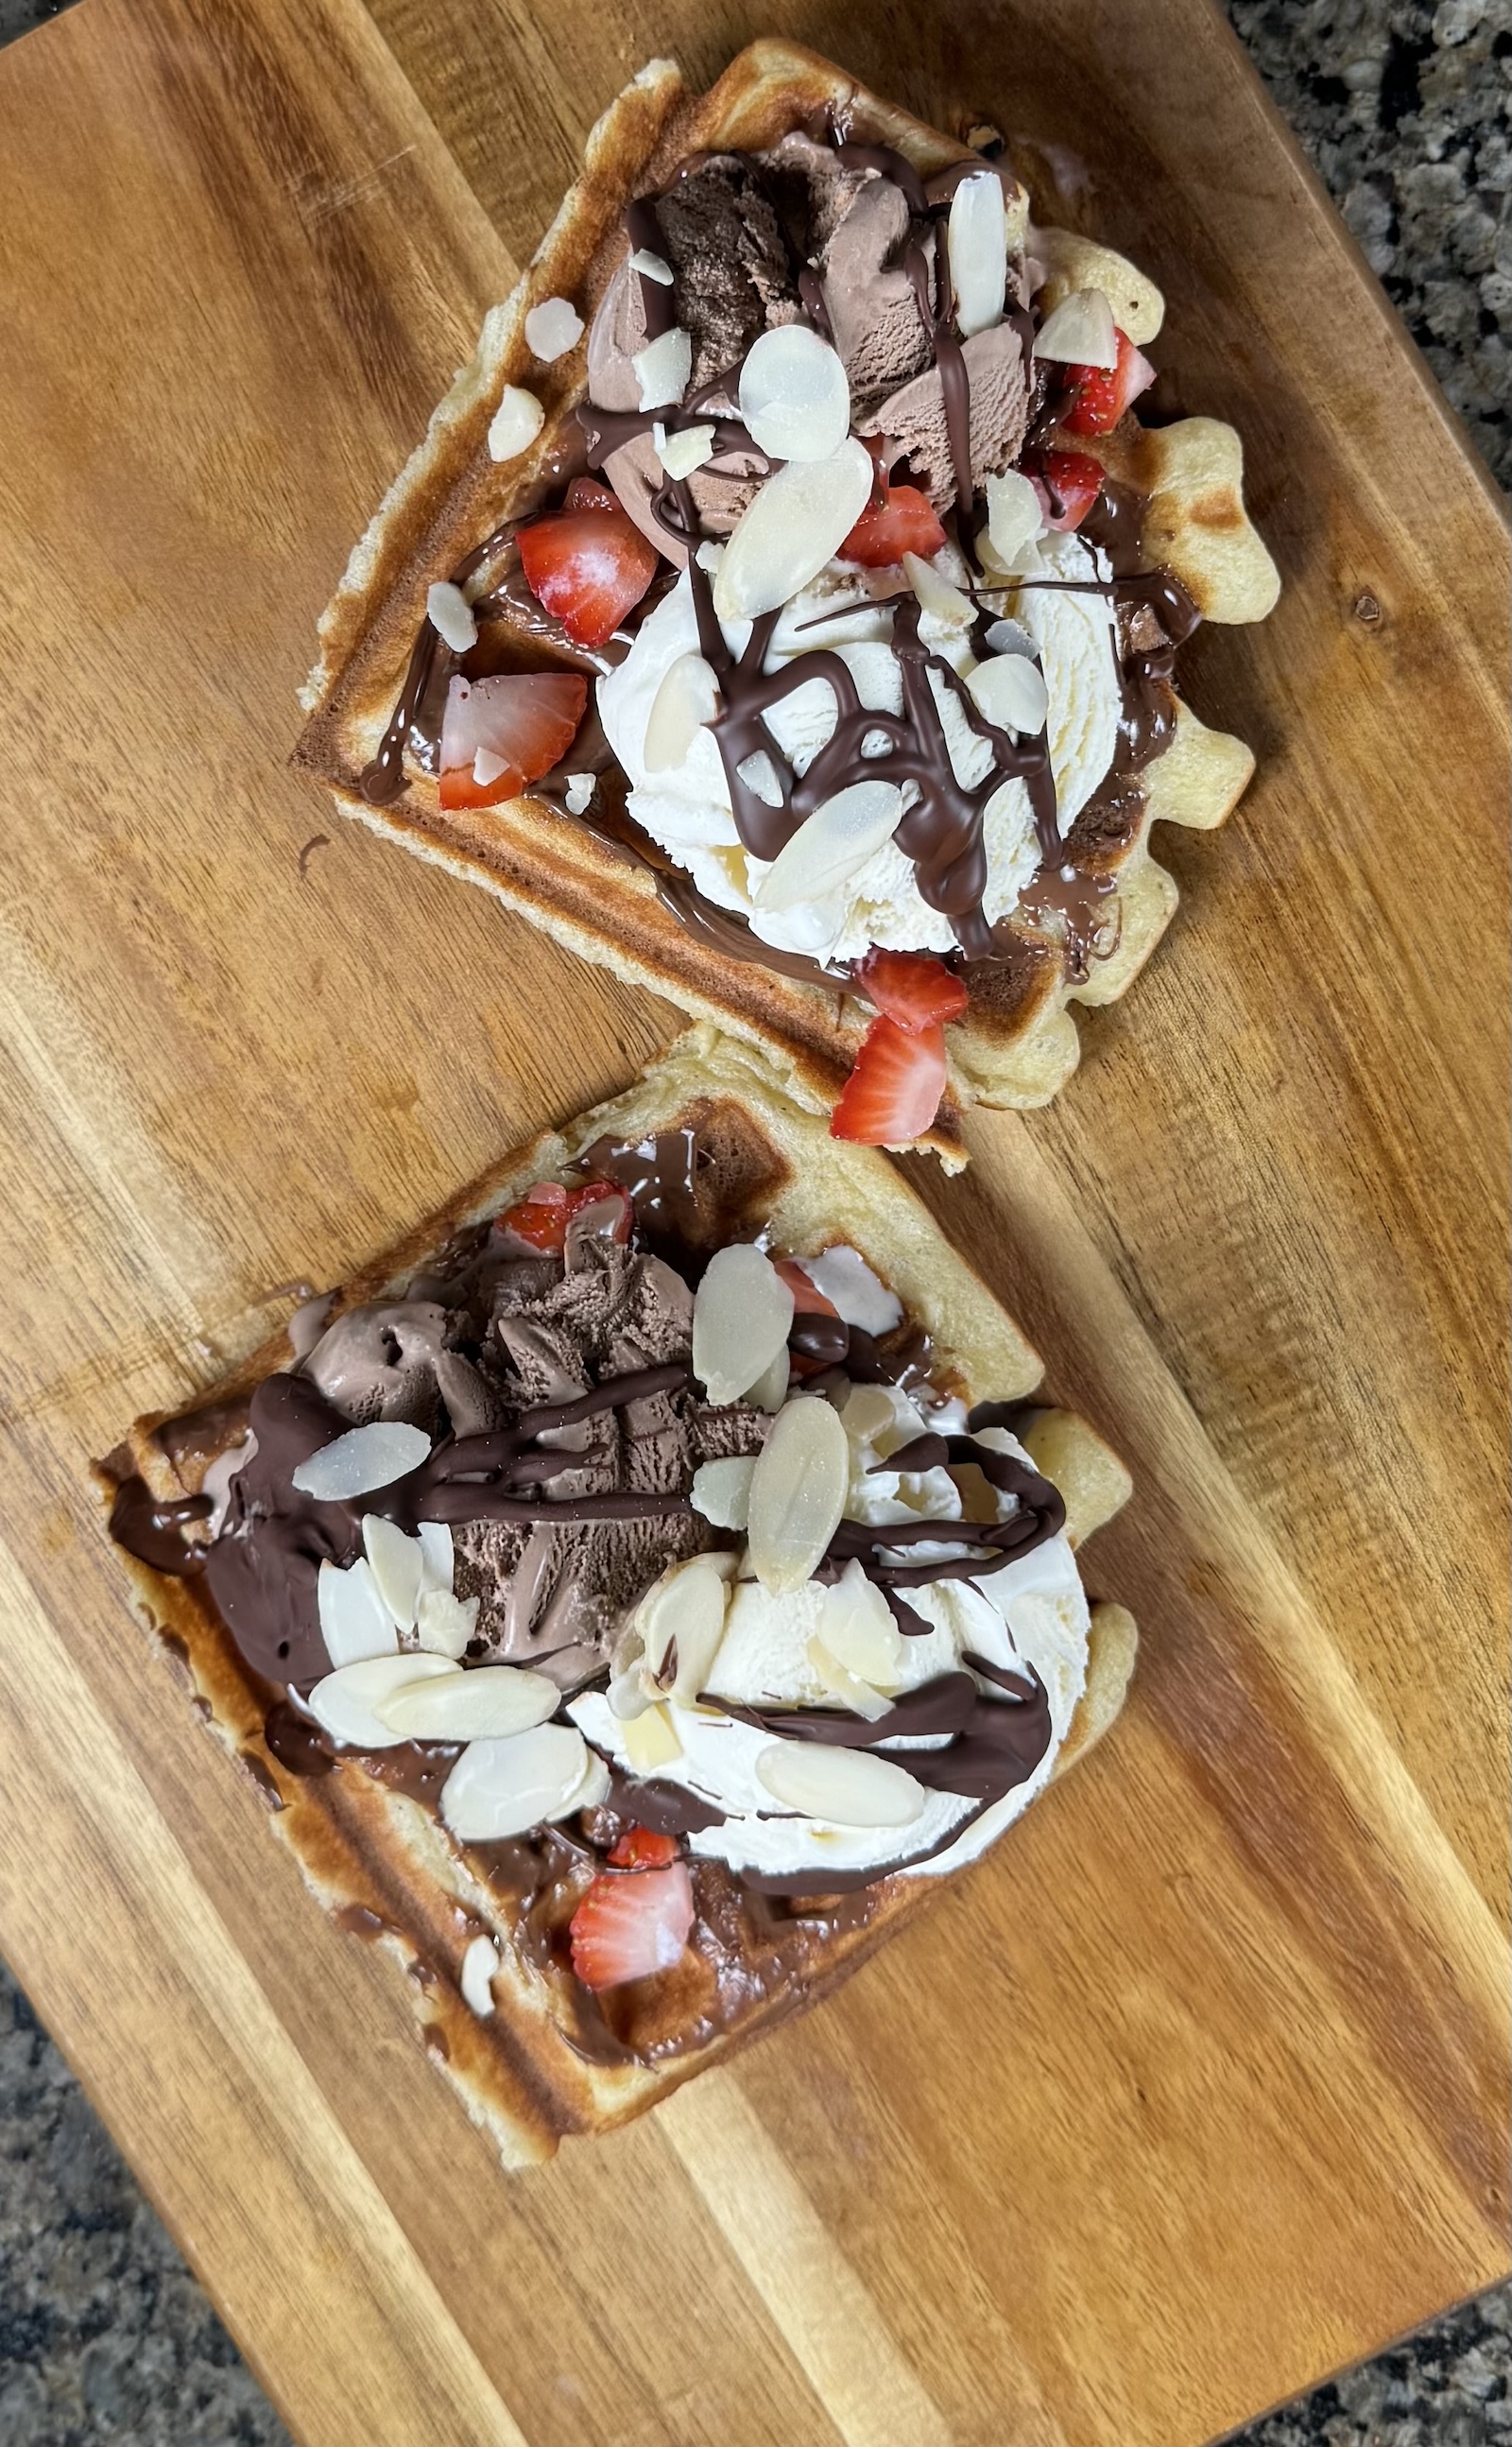
Assemble the Dessert:
Spread a generous layer of Nutella over the warm waffle.
Top with sliced strawberries, almonds, and a scoop of ice cream.
Decorate with Melted Chocolate:
Melt the chocolate and drizzle it over the waffle using a spoon or piping bag to create a decorative design.
Enjoy:
This gluten-free waffle dessert is perfect for satisfying your sweet tooth! Let me know how it turned out and if you loved it.
Gluten Free Customized Chocolate Treats
Ingredients:
Chocolate callets (any gluten free chocolate suitable for melting)
Strawberries or any fruit of your choice
Almonds or any nuts
Oatmeal
Treat sticks
Equipment:
Silicone chocolate molds
Preparation:
Melt the Chocolate:
Melt the chocolate using a microwave or a double boiler until smooth. Stir well to ensure even melting.
Prepare the Add-Ins:
Chop the fruit into tiny pieces.
Finely chop the nuts.
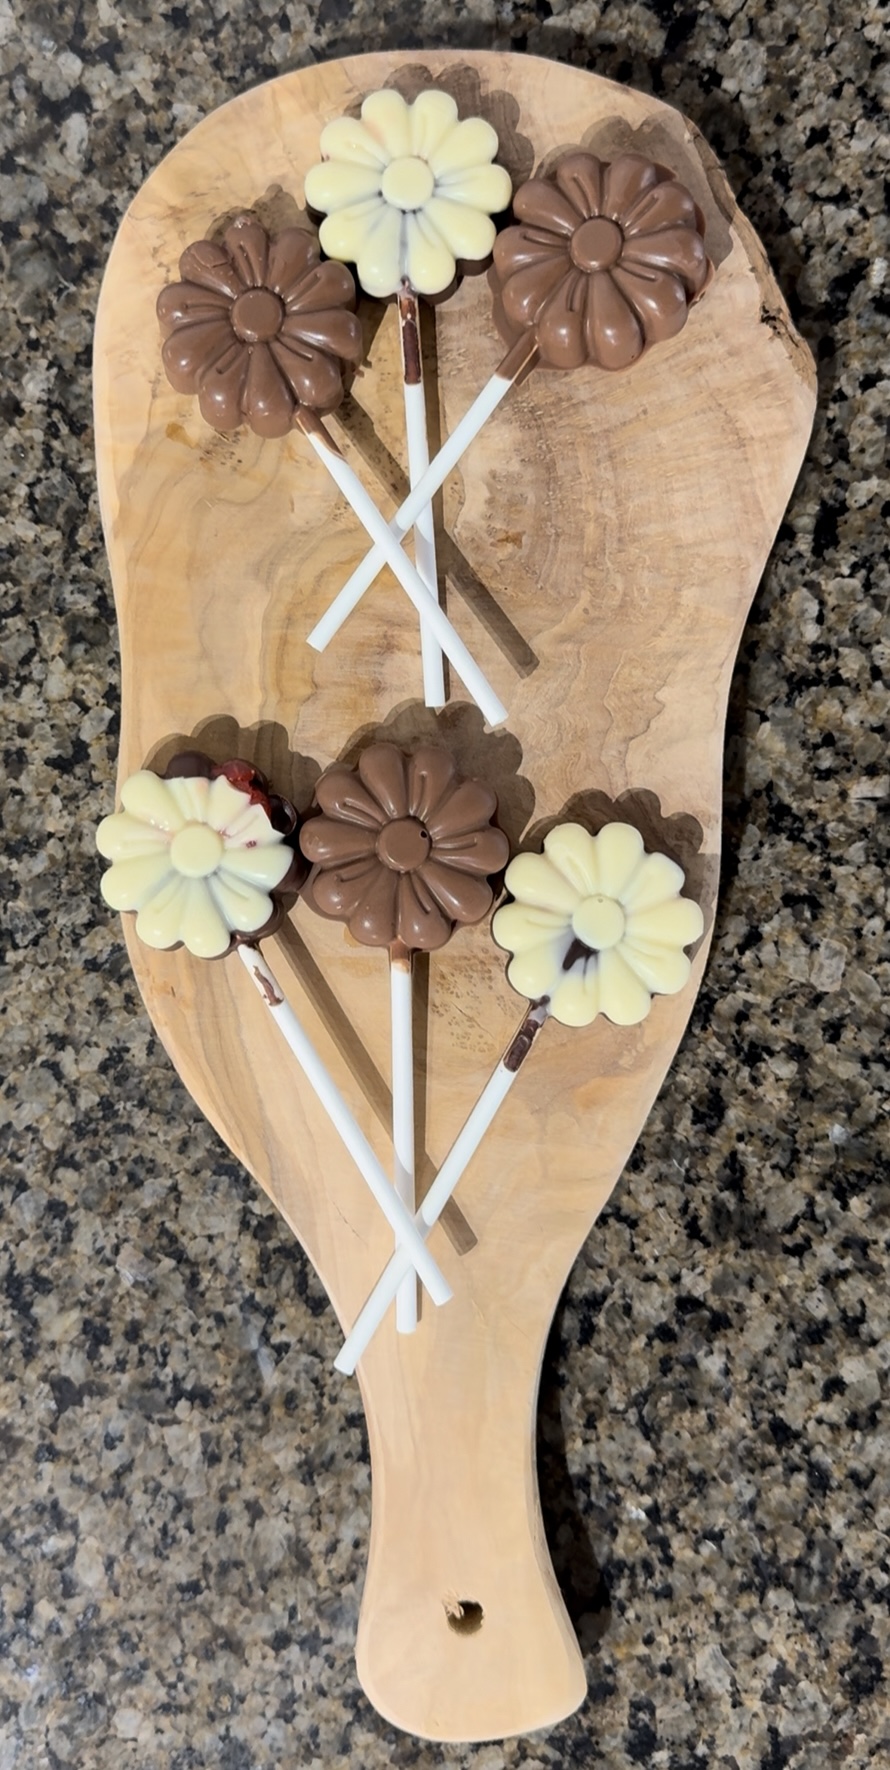
Fill the Molds:
Pour a small amount of melted chocolate into each mold, filling it about halfway.
Add a mix of your chosen fruit, nuts, or oatmeal into the molds.
Top with more melted chocolate to fill the mold completely.
Insert the Treat Sticks:
Gently insert a treat stick into each mold, ensuring it is properly submerged in the chocolate.
Chill the Treats:
Place the molds in the refrigerator for about 30 minutes or until the chocolate has fully hardened.
Storage and Serving:
If you’ve added fruit, keep the treats in the fridge until ready to serve to maintain freshness.
Enjoy:
Get creative with flavours and textures to surprise your taste buds! Let me know how your custom chocolate treats turn out and what combinations you loved the most.
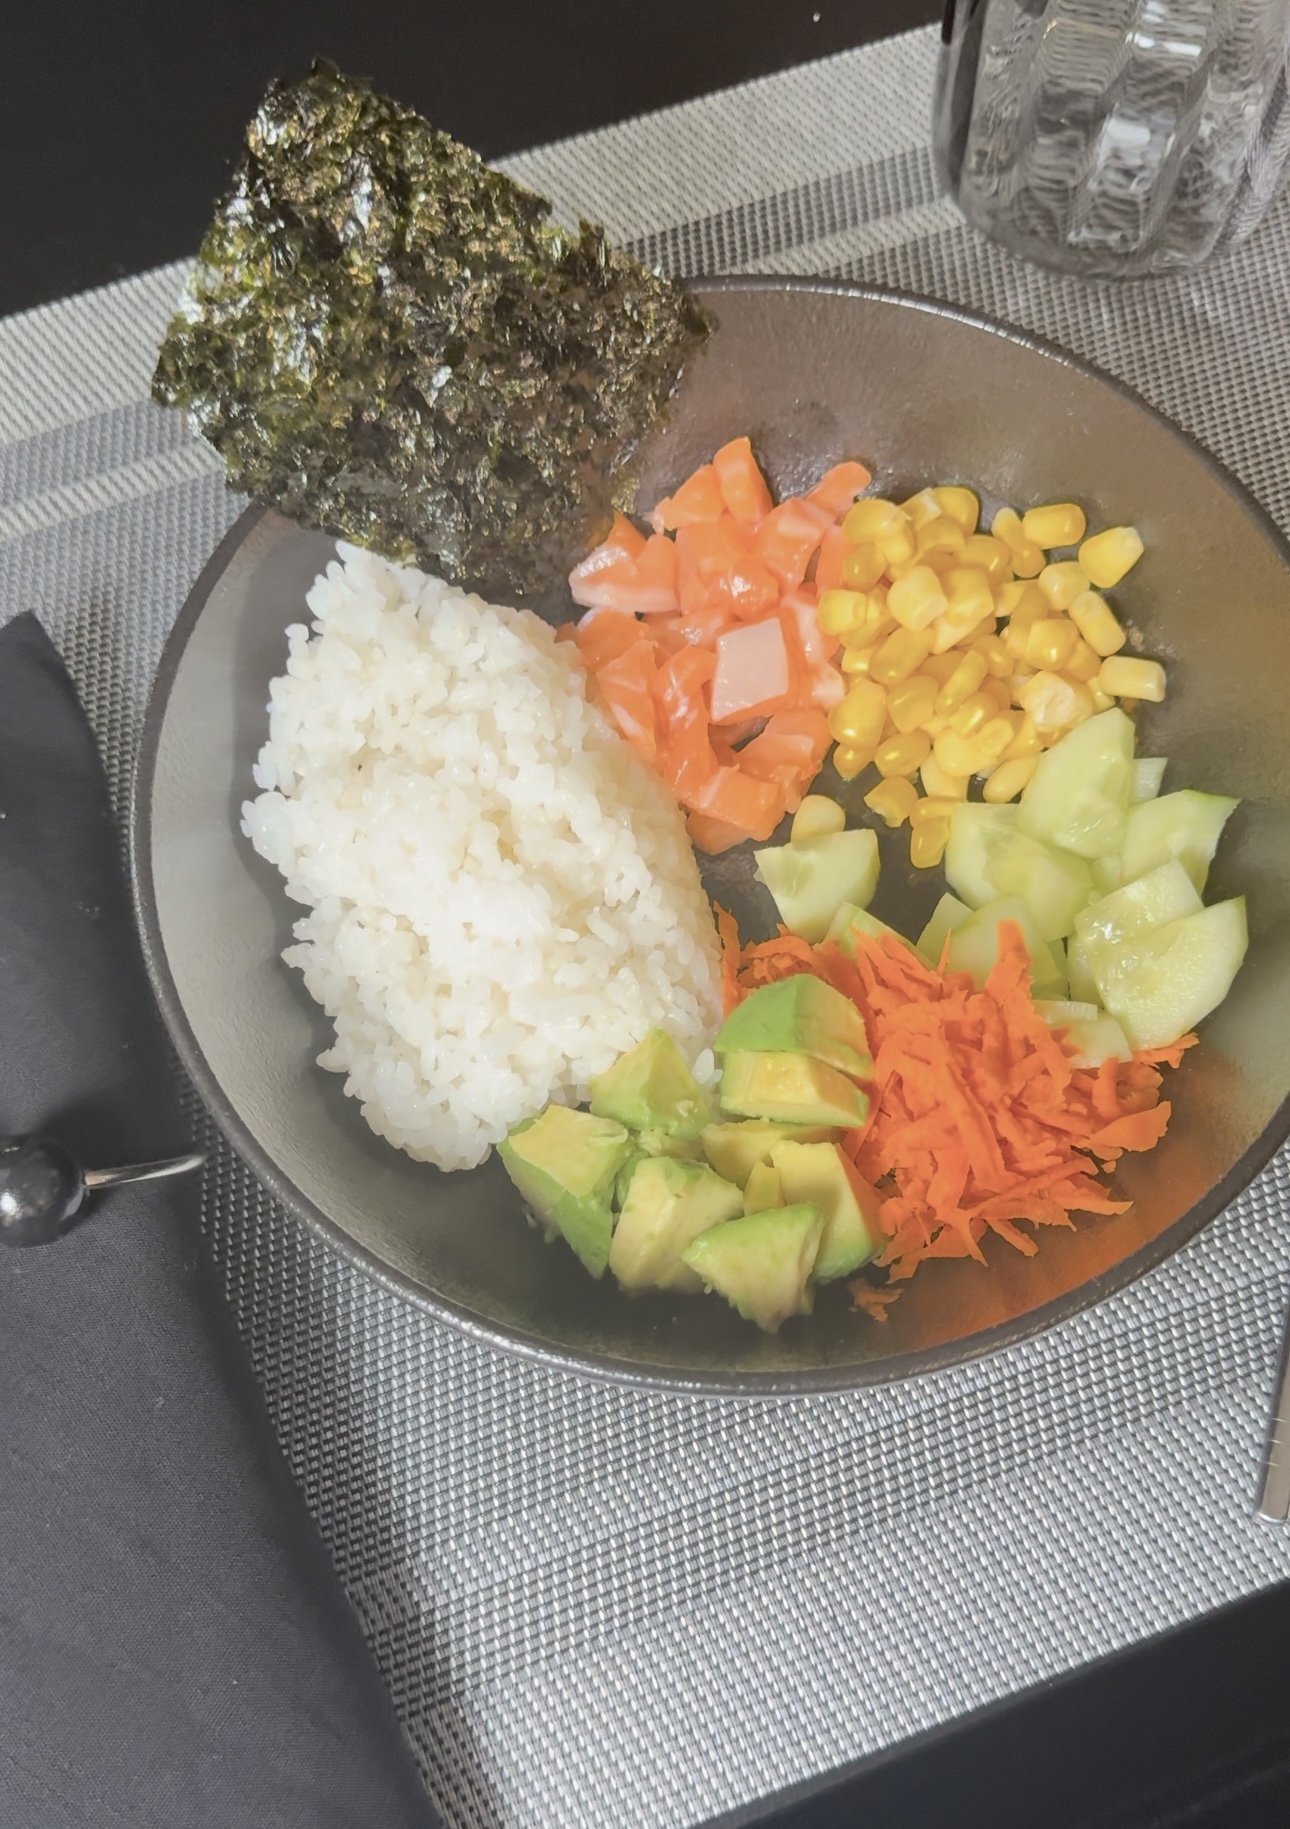
Gluten-Free Salmon Poke Bowl
Ingredients:
1.5 cups of gluten free sushi rice
Sushi-grade salmon
1 carrot, grated
1 cucumber, chopped
1 avocado, chopped
1 cup frozen or canned corn
Seaweed (optional for serving)
1 tablespoon rice vinegar
Soy sauce (gluten-free) for serving
Cold sake (optional, for pairing)
Equipment:
Rice maker
Preparation:
Prepare the Rice:
Rinse the sushi rice thoroughly under cold water until the water runs clear.
Cook the rice in a rice maker, following the manufacturer’s instructions for water quantity.
Once cooked, mix in 1 tablespoon of rice vinegar while the rice is still warm. Set aside to cool slightly.
Prepare the Corn:
If using frozen corn, boil it for 5 minutes and let it cool. If using canned corn, simply drain and set aside.
Chop the Ingredients:
Cut the sushi-grade salmon into small bite-sized pieces.
Chop the cucumber and avocado into cubes.
Grate the carrot.
Assemble the Bowl:
Start with a base of rice in your bowl.
Arrange the salmon, cucumber, avocado, grated carrot, and corn neatly on top of the rice.
Serve and Enjoy:
Serve with a side of seaweed and gluten-free soy sauce for dipping or drizzling.
Pair your poke bowl with a chilled glass of sake if desired.
Enjoy:
This poke bowl is light, fresh, and perfect for a gluten-free meal.